2018-12-31

Happy New Year everyone

Scroll down for english, please. 
Nunca antes este blog ficou tão abandonado como em 2018. Costurei um pouco mais do que publiquei, mas ainda assim, a costura não foi o meu centro neste último ano. Não posso prometer voltar a ser o que era. Não tive nem o mesmo tempo disponível, nem a a disposição de antes... ainda que o amor seja o mesmo. Em 2019 pretendo usar este blog mais da forma que usava quando criei o meu primeiro blog... um lugar onde documentava o que fazia, em vez de fazer para publicar "por obrigação", se é que me entendem. Isso inclui vir ainda publicar tudo o que for possível daquilo que fiz até aqui e que não cheguei a partilhar, para que talvez, o blog volte a ganhar mais vida. Honestamente espero que assim seja. Não consegui cumprir com as resoluções na costura em 2018, e para 2019 não farei nenhumas novas. Sejamos livres. 

Never have I left this blog as abandoned as I did in 2018. I did sew a few more than I posted, but still, sewing wasn't the real thing for me in this past year. I can't promise it will be back as it was before. I haven't got the same amount of time I had for it, nor the mood... although the love is still the same. In 2019 I want to use this blog more as I did when I first created my very first blog... as a place for me to document everything I made instead of a place I feel "forced" to sew something to document, if you know what I mean. This includes posting here anything else I have made in the past and has never been blogged before, so hopefully, this blog will be a bit more active again. Or so I honestly hope. I couldn't keep up with my sewing goals in 2018, and I won't make any new ones in 2019. Let's just be free. 

2018-12-18

Girl's Sport Skort

Scroll down for english, please!


Estava aqui a tentar lembrar-me há quanto tempo tinha testado um molde antes deste que partilho hoje, e a verdade é que não me consigo lembrar. Parece ter sido há uma eternidade. Não interessa... eu ando pouco atenta às chamadas para testes, no entanto e felizmente, deparei-me com a última da Thread Faction Studio, para o novo molde #126 Girls Sport Skort. Não preciso dizer novamente o quanto eu gosto dos moldes da Liz, pois não? 

I was here trying to remember when was the last time I tested a pattern before the one I am just to tell you about, but truth is I can't remember. Feels like ages ago. Anyway... I am not so aware of new testing calls as I was before, but I was lucky to come across the latest one from Thread Faction Studio, for the latest #126 Girls Sport Skort pattern. I don't have to tell you again how much I love Liz's patterns, do I?  


Eu fiz a mais fácil das cinco versões diferentes neste molde, que é a da saia em semi circulo. O molde é mais uma vez, óptimo e conquistou certamente a miúda cá de casa. Estava louca ao perceber que esta não era uma saia banal,  e que por baixo tinha os calções. Nas suas palavras "mãe, já posso correr e saltar à vontade que não se vão ver as minhas cuecas!". Sim, ela adorou. 

So, I did the easiest version from the five different style options on this pattern, the half circle skirt. The pattern is again great as always and a winner as much as my daughter can tell. She was beyond excited when she realised it was no ordinary skirt, it had shorts underneath and in her own words "mom, now I can run and jump, and my underwear won't show!". Yes, she loved it. 


Usei uma malha mais quente para a saia embora ache que o molde é muito mais direccionado para a primavera ou verão, só que eu tinha de o fazer e fotografar agora, por isso lá foi (é a mesma malha que usei aqui). Não estava nada segura que ficasse bem com collants, mas lá experimentámos. Inicialmente estranhei, mas depois habituei-me e não acho que fique mal d'um todo. Além do bónus que é segurar as collants para não escorregarem. 

I used a warmer knit because although I see this skort as a more spring/summer like garment, I was sewing it right when we're heading into winter, and I had to take photos too (That's the same knit I used here by the way). I had no idea if this would work with tights, but I had to try. At first I thought it looked weird, but then I got used to it. It's fine. And as a bonus, it keeps the tights from sliding. 


Gostavam de ver mais coisas que fiz com os moldes Thread Faction Studios? Vejam os links abaixo:

Would you like to see other stuff I made from Thread Faction Studio patterns? Check out the links below:

Pattern #104 tank top - HERE
Pattern #105 crop top - HERE
Pattern #113 romper - HERE 
Pattern #115 beret - HERE
Pattern #116 cardigan - HERE
Pattern #123 Girls Tank and Pants - HERE

2018-12-13

Rival Raglan Tunic

Scroll down for english, please!


Oh, estou tão determinada em publicar todas as minhas peças feitas, fotografadas mas nunca publicadas do passado! Hoje trago uma túnica que fiz no início deste ano que já está para terminar. Lá para Março publiquei o vestido que fiz para a minha filha com o molde rival raglan dress da GYCT. Na mesma altura fiz também uma outra versão do molde, como prenda de aniversário para a filha de uma amiga. A miúda adora o Jack Skellington e eu queria fazer-lhe algo dentro do tema. 

Oh I am so determined on posting about my made, photographed and never posted pieces from the past! Today I am sharing a tunic I made in the beggining of this now ending year. Back in March, I posted about the rival raglan dress by GYCT that I made for my daughter. Also back then I sewed another version of the pattern for a friend's daughter as a birthday gift. The little girl loves Jack Skellington and I wanted to make her something with the theme. 


Bordei a cara do Jack na parte da frente do vestido. Demorou-me mais isso do que costurar todo o vestido, tal como aconteceu com a aplicação do primeiro rival raglan que fiz... e tal qual, valeu tanto a pena, não podia estar mais satisfeita. Os meus miúdos gostaram tanto também que me fizeram prometer que lhes faria umas t-shirts com o Jack Skellington também, promessa que ainda não cumpri. 

I embroidered Jack's head into the front of the dress. It took much longer than putting the dress together, as it happen with the appliqué I made on my first rival raglan... but it was so much worth it. I couldn't love it better. My kids loved it so much as well that they both made me promise I'd make them both a Jack Skellington shirt too - promise I have fail to keep yet. 


Queria mesmo usar as cores que usei, mas não tinha nenhum tecido com o roxo. Claro que tive de fazer o que faço melhor e usar uma peça pré-amada, meter tesoura e transformá-la nesta nova peça. O tecido das mangas, saia e colarinho foi o que sobrou de um dos meus mais afdorados vestidos, feitos por mim (aqui). 

I really wanted to use the colors I did, but I didn't have any of the purple fabric available. Of course, I then turned out to what I do best and used a previously loved piece to cut and use in this new one. The fabric for the sleeves, skirt and collar band were leftovers from one of my all time self-sewn fave dresses (here). 


Desta vez fiz as mangas a 3/4 e a opção túnica, em vez de vestido. A miúda mora longe e para ter a certeza que lhe serviria, se não na altura, mais tarde então, fiz-lhe um número acima (em relação À idade), pelo sim pelo não. Aparentemente, tanto a mãe como a filha (e o pai) adoraram, o que me deixou bastante feliz de saber. 

This time I did the 3/4 sleeves option and tunic instead of dress lenght. Because the girl does not live close I made her a bigger size (according to her age) so I could be safe it would fit, if not yet, than a bit later. Apparently, both mom and daughter (and father) loved it, which made my day when I heard. 

2018-12-08

DIY Back Warmer Pillow

Scroll down for english, please. 


A ideia de hoje é uma versão um pouco maior das almofadas térmicas que fiz há uns anos para o meu pai e o meu sogro e que vos mostrei no último post. A ideia para esta surgiu quando a minha mãe andou muito mal das costas e me disse que usava as almofadinhas do meu pai para lhe dar algum alívio. 

Today's idea is just a slightly bigger version of the warming pillows I made for my father and father in law many years ago, and have shared in my last post. The idea came to me when my mom hurt her back really bad and told me she was using my father's little pillows to get some relief. 


Assim que com a ideia das anteriores, fiz-lhe uma semelhante mas tamanho XL para que pudesse usar na zona lombar. Assim em vez de colocar as pequenas que não chegavam a cobrir toda a zona, passou a usar esta que tinha o tamanho ideal. 

So, just like the previous ones, I made her a XL sized piloow so she could use on her lower back. Like this she didn't need the smallest ones which didn't cover all the hurt area, and could use this one istead with the right size. 


Tal como com as anteriores, fiz a almofada em algodão e depois fiz-lhe a forra para que a pudesse lavar sempre que necessário. A almofada em si, não se pode molhar devido ao seu conteúdo, como é óbvio, que consiste em arroz, alfazema (flores) e óleo essencial (eu usei gerânio porque adoro, mas fica ao vosso critério, mas se usarem um com propriedades anti-inflamatórias e/ou calmantes tanto melhor). 

Again, I made her the pillow with cotton fabric and also the cover, so she could take it off to wash as many times as needed. The pillow itself can't be wet because of its content, obviously, since it is filled with rice, lavander (flowers) and an essencial oil (I used the geranium because I love it, but you can use another one, of course using one with anti-inflamatory properties and /or calming ones the better). 


Este tipo de almofada pode usar-se quente ou frio. No primeiro caso, aquece-se entre 30 a 60 segundos no microondas. No caso do frio (para reduzir inchaços por exemplo), colocar dentro de um saco plástico hermético e congelar. 

This type of pillow can be used warm or cold. In the first case, hit it for about 30 to 60 seconds on the microwave. In the case of using cold (to decrease swelling for example), put it inside an hermetic plastic bag and freeze. 

2018-12-02

DIY Hand Warmer Pillows

Scroll down for english, please. 


E já estamos em Dezembro. Para quem tem prendas a fazer, é melhor dar aos dedos e apressar-se porque em menos de um piscar de olhos o Natal está ai. E falo por mim, claro está, que ainda ando enrolada com as mesmas coisas. Isto de as ir fazendo aos bocadinhos rende menos, no entanto ando a resgatar prendas do passado que nunca cheguei a partilhar, algumas são bem rápidas de fazer, por isso espero que sejam ideias úteis para quem me lê.

And it's December already. To those of you who still have gifts to make, you better hurry up and move your fingers because Christmas will be here in less than a blink. Of course, I am one of you too since I am still working on the same ones for a while, making them slowly takes longer. Still, I have been going through past gifts I made and never shared here before, so maybe some of them can be handy to any of you, most are pretty quick to make. 


A sugestão de hoje são estas almofadinhas térmicas que fiz há uns anos, para o meu pai e para o meu sogro. O primeiro sofre imenso de problemas de circulação nas pontas dos dedos todos os invernos e foi daí que me surgiu a ideia. Bastou para tal, costurar duas pequenas almofadas (para cada um deles) que coubessem nas mãos, e enchê-las com arroz, alfazema e um óleo essencial. Depois fiz uma fronha à medida para que se possam lavar. Ainda incluí as instruções de uso em papel e os cuidados a ter. Gostaram? 

Those little hand warmer pillows are today's suggestion, I made them a few years ago for my father and father in law. The first one has a lot of blood circulation in his finger tips every winter, so my idea of making these came from that. To make them, I just had to sew two small pillows (for each of them) that would fit within their hands and fill them up with rice, lavander and some essencial oil. Then I made the pillow cover to fit so they could wash them. I also added the instructions and warnings on paper. Did you lie it? 

2018-11-27

Easy & Quick Candy Cane Ornament

Scroll down for english, please. 


Esta é mais uma ideia natalícia que fiz o ano passado e que não cheguei a partilhar aqui no blog. 
Adoro embrulhos diferentes e originais quando chega a altura de oferecer as minhas prendas, e esta ideia em particular foi inspirada no papel que comprei no ano passado, cujo motivo eram as bengalas doces (e que podem ver na foto abaixo). 

Here's another Christmas idea from last year that never made it to the blog. 
I love different and original rapping when it comes to wrap my gifts, and this particular idea was actually inspired by the wrapping paper I bought last year, because of it's printed candy canes (picture below). 


Inicialmente o que eu pretendia era comprar umas bengalas doces verdadeiras, mas não encontrei por aqui. Não é que tenha procurado exaustivamente, apenas procurei pelos locais onde ia passando e nenhum tinha. Este ano por exemplo, já encontrei uma caixa de dez unidades numa das minhas lojas preferidas. Trouxe-a comigo e ainda está por decidir o que farei com ela. 

My first thought was to get the real thing but I couldn't find them anywhere. Well, It's not like did look that hard for them, I just checked each place I went on my daily routine and none of those had it. This year though, I have already found a box of them in one of my fave shops and of course I brought one with me, still I need to figure out what to do with it yet. 


Para tal usei pipe cleaners (a tradução literal é limpador de cachimbo, não sei mesmo que nome se dá a isto em português). Foi só juntar um branco e um vermelho e enrolar um no outro. Depois cortei ao meio e cada metade foi usada para uma bengalinha, é só arredondar uma das pontas. Como usei nas prendas (colei) não acrescentei mais nada, mas quem quiser pode também colocar um fio fino na parte arredondada e pendurar na árvore de Natal ou onde lhe apetecer. 

To make this, I just grabbed two pipw cleaners, one red and one white and rolled them into each other. Then I cut it in half and each part was used to make a cane, I just needed to round one of the edges in order to get it finished. Since I glued mine to my gifts, I stopped here but if you plan on hanging them on your Christmas tree or anywhere else, you just have to tight a thin thread to it to do so. 


Podem também cortar mais pequeno ou maior. Cheguei a cortar em 3 partes iguais e foram as que achei mais fofas. Usei em quase todas as prendas que entreguei o ano passado e ainda tenho algumas que talvez use este ano, embora ande à procura de algo diferente para esta vez. E por ai? Alguma forma especial de distinguir os vossos embrulhos? 

You can also cut your canes longer or shorter. I did cut some in 3 equal parts to make mine and those were the cutest ones. I used most of them on my gifts last year but I still have a few that I might use again this year, though I'd rather find something different this time. What about you? Do you have any tips to make your wrapping stand out?

2018-11-20

Fabric Tissue Case Keyring

Scroll down for english, please. 


Para além da família e dos amigos, gosto sempre de dar uma pequena lembranças às professoras/educadoras dos miúdos na altura do Natal. Normalmente gosto de lhes dar algo útil; no ano passado porém, não lhes dei nada, não consegui organizar-me e fazer tudo o que queria com toda a situação à nossa volta. 

Apart from family and  friends, I always like to give a little gift to my kids teachers/caretakers around Christmas time. Usually I like to give them something useful; last year though, I gave them nothing at all because I didn't come around to put myself together and make everything I wanted. 


Na esperança que as coisas corram melhor este ano, hoje já consegui acabar uma das quatro lembranças que pretendo fazer. Não é nada de original, mas penso que lhes posso dar jeito, principalmente à educadora e auxiliares do mais pequeno. Elas andam sempre com os lenços atrás de qualquer forma, assim com o chaveiro incluído sempre será mais fácil. Ou isso eu creio.

Hoping for things to go better this year, I have made the first gift for one of the four ladies that are responsible for my kids while they are at school. This is not a very original gift but I think it's handy, especially for those taking care of younger kids. They are always carrying tissues around, so I figured, having a keyring one would be easier. I hope so, anyway. 


Já fiz muitos destes porta lenços no passado, como até já vos mostrei aqui, penso que sejam os últimos que fiz antes deste - curiosamente também foram para as responsáveis pela minha filha naquela altura. Ainda assim, nunca tinha feito nenhum tipo porta chaves e não paro de me perguntar porquê. Leva literalmente um ou dois minutos a adicionar essa opção e faz toda a diferença. 

I have made a lot of these cases in the past, and here I showed you what I believe to be the last ones I had made previous to this one - funny enough, they were made for my daughter's carers too. But, I had never made a keychain version until today and I keep wondering why. It literally takes like one or two more minutes and makes all the difference. 


Senti-me mesmo bem por ter feito algo que demorou tão pouco a terminar. Quando acalmamos com o ritmo frenético de costuras como eu o fiz, acabar qualquer coisinha que seja dá-nos um grande prazer. E é assim que me tenho sentido nos últimos tempos. Comecei mais duas prendas e tenho avançado em ambas lentamente, sem presas e aproveitando cada momento. Uma delas é o quiet book que queria fazer, como vos disse no post anterior, e a outra... dou-vos uma pista... 

It really felt so good to get something done so quickly. When you break your frenetic sewing mood like I have a while ago, it is always such a huge pleasure to see something finished. That's how I've been feeling lately. I have started two more gifts and I've been slowly sewing them, taking my time and enjoying the process. One of those gifts is the quiet book I said I wanted to sew in my previous post, and the other... I'll give you a hint... 

2018-11-15

Fabric Activity Cube

Scroll down for english, please! 


Durante muitos anos maravilhei-me com os chamados "quiet  books", traduzido à letra seria um livro do sossego, com actividades para manter os pequeninos quietos. Adorava ver páginas e páginas deles. E desde a primeira vez que vi um que um projecto do género entrou para a minha lista... sim, aquela interminável lista de coisas que gostava de fazer um dia. 

I've been amazed by those quiet books forever, if you don't know them, they are activity to keep young kids, well, quiet. I loved to go through the different pages. And since I first saw one of these it made it to my neverending sewing wish list. 


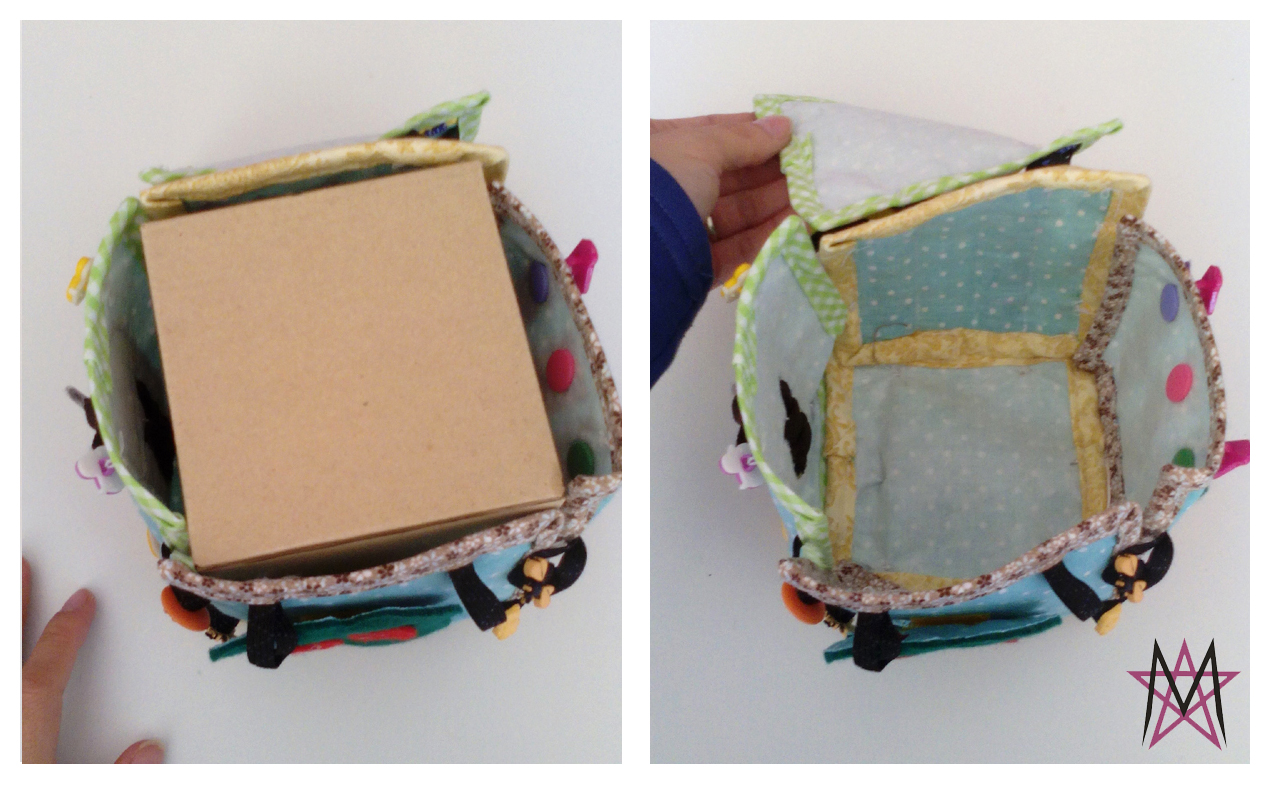
Nunca fiz um até ano passado, quando consegui fazer algo semelhante para oferecer ao filho de uma amiga, e garanto-vos que apesar dos pequenos defeitos, foi das coisas que mais prazer me deu fazer até hoje. O que eu fiz não foi um livro mas sim um cubo de seis painéis de actividades que se podem unir por botões e elásticos uns aos outros. A criança pode brincar com ele aberto, ou com ele fechado. 

I've never made one until last year though, when I got to make a similar thing for a friend's son, and I can assure you that despite the tiny faults it might have, it was one of the things I enjoyed making the most so far. I made not a book but a cube though, out of six panels that can be put together through buttons and elastics. The child can play with it flat, or close it and give it shape. 


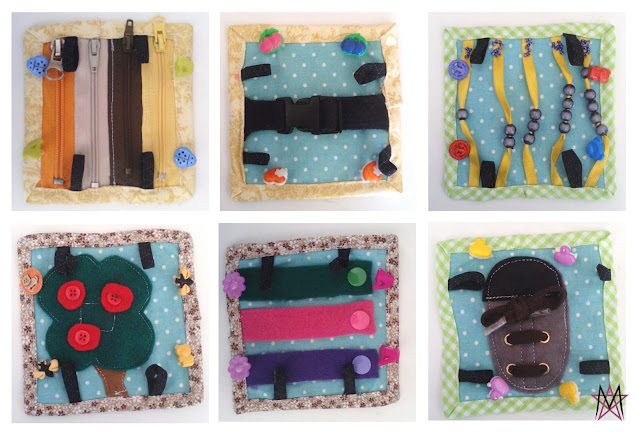
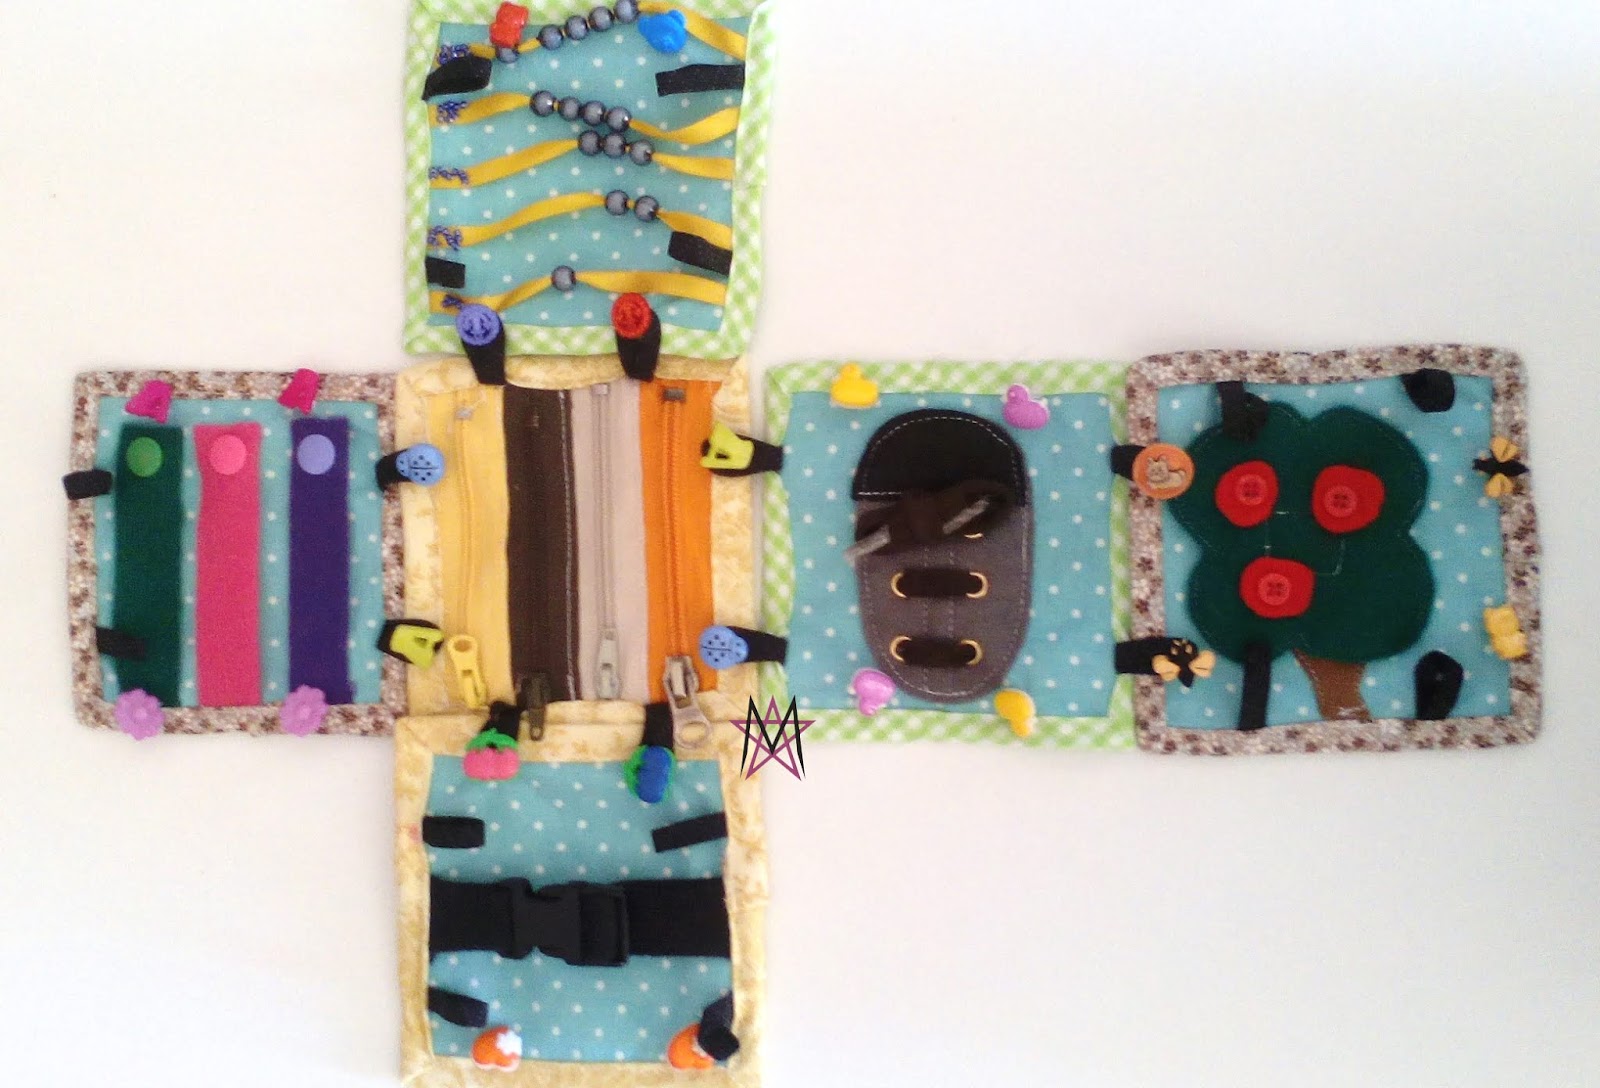
Optei por fazer painéis com actividades que permitissem treinar a destreza, e passo a explicar cada deles, da esquerda para a direita e de cima para baixo. No primeiro coloquei 3 fechos de correr, no segundo um fecho clip, para crianças mais pequenas este não é muito fácil de usar, mas ainda assim, pode sempre ir tentando. No terceiro coloquei os números de 1 a 5 em cima (numa espécie de bordado com missangas) e logo por baixo uma fita com a quantidade de bolinhas correta. Passando para a fila de baixo, uma árvore com maçãs (botões) para pôr e tirar, no meio, fechos de molas e por fim, os atacadores para aprenderem a colocar ou simplesmente a dar o laço. 

I chose to make panels that allowed the child to practise his skills, and I will explain each one. from left to right and from top to bottom. In the first one I sewed 3 zippers, in the second a clip closure, this one might be a bit hard to use for smaller children, but still they can always keep on trying. In the third one I added the numbers from 1 to 5 (with some kind of embroidered beads) and then ribbons with the correct among of balls for each one of them. In the bottom row, there's a tree with apples (buttons) to put on and off, in the middle, kam snaps and to finish, the laces so the child learns how to lace it and tight. 


Tirando o painel dos números, usei diferentes formas de fechos pois os miúdos são deparados com todos eles nas suas roupas, mochilas, etc. e o facto de conseguirem usá-los sozinhos faz deles muito mais autónomos e independentes, e eu adoro uma criança independente que se desenrasca sozinha (o meu filho mais novo, está mesmo a precisar duma coisa destas também). 

Apart from the numbers panel, I used different closure methods that kids find in their own clothes, bags, etc. and getting them on their own makes them so much autonomous and independent, and oh boy do I love an independent child (my youngest clearly could use one of these too). 


Para o cubo se manter direito quando está montado, arranjei uma caixinha em cartão praticamente do mesmo tamanho para colocar dentro e voilá, feito. Apesar deste cubo já ter um ano, lembrei-me de o partilhar agora porque é uma óptima sugestão de prenda para o Natal. Aliás, este ano quero fazer um em formato livro e ando a inspirar-me. Vamos esperar para ver como sai. 

For the cube to keep its shape when fully assembled, I grabbed a small card box basicly the same size as the cube and voilá, done. Although this one is from last year's, I thought I could share it anyway since it is such a good Christmas gift suggestion. Actually, I want to make another one, as a book this year and I have been getting inspired. Let's see how it'll turn out. 

2018-09-17

Thread Faction #123 Pattern Tour

I am joining Liz from Thread Faction for her Sewing Knit Basics pattern tour. Today I am sharing my take on her new pattern #123 Girls Tank and Pants. 


The Tank n Pants Set was a winner in our house. I asked my daughter if I could try it on hr when I finished and she immediately asked me if she could sleep in it (it was about bed time) and of course I said yes. She loves these sets and I love to sew them for her. I see a few more in a near future coming out of my sewing machine. 


So. My kiddo's measurements put her on a straight 7 and I am happy with it although I think the bottom piece was a bit baggy on her. It allows to grow though which is something I always appreciate on a me made anyway. And, it is still comfortable she says, so all good here. 


The set is made of two pieces, top and knickers, it comes in sizes 2-10, has an optional gusset - which I did by the way - and it is a begginer's friendly pattern, just, so you know. It is another quick and easy sew, just what I need to get back into sewing. 


The main fabric from the top was given to me by my friend Patrícia, when she downsized her stash. The green one I used from the bottom of some launge pants my sister bought for me. They were new but she got it for me, not to wear as she knows I wouldn't wear anything with this lettuce colour on, but because it was a lot of knit for a little amount of money and I could refashion them. I love my sister (she got me two of these).


Apparently this is perfect to sleep in... except she was pretending to do so in my bed, instead of going to her own. Anyway, if you liked it and you got the pattern or are planning on it, make sure to follow Liz's Thread Faction Sewn Series on youtube, here's her first episode for you. 

2018-08-24

Bespoke Briefs blog tour

Scroll down for english, please!

Olá a todos!! OMD! Nem acredito que passou tanto tempo desde a última vez que passei por cá. Não tenho tido mesmo vontade nenhuma de costurar, e ainda por cima andei a mudar-me muito devagarinho de uma casa para a outra. 

Hello everyone!! OMG! I can't believe it's been so long since I last posted on the blog. I really haven't been in the mood to sew, and plus I have been busy packing and slowly moving from one house to the other. 


Então, estou de volta, e estou aqui hoje para participar na tour do molde Bespoke Briefs. Como faço tudo no último minuto, só ontem é que acabei as minhas... Mas até é uma coisa boa, prova que o molde é super rápido de fazer e despachei duas cuequinhas que adoro num piscar de olhos. 

Anyway. I am back, and I am here today to be part of the Bespoke Briefs pattern tour. I am always a last minute do-er, and that's why I finished mine the day before my post date... Which is good, because this is a quick project and I wiped up two new knickers to be in love with, in a blink of an eye. 


Ora, o molde é da Thread Faction (e como já toda a gente deve saber, eu adoro a marca), e é incrível como me assentam mesmo bem. Como já disse, fiz duas . Numa usei elástico decorativo no acabamento e na segunda usei as faixas para terminar. Estou com sérias dificuldades em escolher uma favorita das duas.

These knickers pattern is a design from Thread Faction (as you all know by now, I love it), and I can't believe how well they fit me. As I already mention I made two of these. In one I used decorative elastic to finish it, and I used bands on the second. I am now finding it hard to choose a fave from both of them. 


Usei restos de tecidos que usei anteriormente. Tenho uma blusa que combina com as cuecas das riscas, e a minha filha tem uma com o mesmo tecido que fiz mais recentemente. Já com o tecido das borboletas, tinha feito uma t-shirt para a miúda também.

I used scraps I had in my stash from previous projects. I have a matching shirt for the stipped fabric knickers, and my daughter got a shirt with that same fabric more recently. As for the butterflies one, it is also my daughter that has a shirt in the same fabric. 


E agora, se ainda não o fizeram, espreitem as outras versões publicadas nos últimos dias. 

And now, if you haven't yet, go check out all the other versions posted in the last couple of days. 

20/8

21/8

22/8

23/8

24/8

25/8

2018-04-25

Polka Dot Peplum |Pattern by GYCT|

Scroll down for english, please!


Ando muito satisfeita comigo mesma. Há tanto tempo que não costurava como tenho feito nas últimas semanas. Obviamente ainda não mostrei tudo o que fiz, mas lá iremos... ou pelo menos, espero. Hoje trago-vos uma peça que fiz para a minha mais velha e que ela aprovou. O molde que usei foi o Polka Dot Peplum da GYCT Designs e escolhi fazer este molde neste momento porque não requer malhas e eu ando um bocadinho, como dizer?! Cansada, farta?! Não sei, andava a apetecer-me costurar um tecido diferente. 

I am so happy with myself. It's been a while since I sewed as much as I have done lately. Obviously I haven't shared it all yet, but we'll get there... or so I hope to. Today I am bringing you this piece I made for my oldest, which she approved. The pattern I used was the Polka Dot Peplum from GYCT Designs and I picked this one because I haven't been in the mood for knits lately, I feel a bit, how to say it? Tired, done? I don't know, I felt like sewing a different type of fabric for a change. 


O tecido é de algodão, e usei um resto que ainda tinha depois de ter feito este há uns três anos atrás. Foi m.e.s.m.o à conta, só sobraram umas tirinhas que não se aproveitam para nada para contar a história. Poderia ter sobrado um bocadinho mais se não tivesse feito asneira. É que em vez de cortar uma peça da saia normal, cortei-a na dobra e ficou com o dobro do comprimento. Só dei por isso quando comecei a franzir a frente para juntar a saia ao corpo. Ficou muito mais franzida na frente do que a trás, mas sinceramente não desgosto, do mal o menos. 

This was a scrap of cotton woven that I got left after making this one like three years ago. It was r.e.a.l.l.y just enough, I only had very small scraps left that aren't good for anything at all. I could have gotten just a bit more left if I haven't screw it up, by cutting the front skirt on the fold, and getting this way twice the lenght when it wasn't needed to. I only realised the mistake when gathering it to sew to the top portion. It was much gathered on the front than the back, but truth is I actually like it, so... 

A frente e trás são forradas e para o meu usei restos de um lençol de algodão bastante fino. As mangas curtas em balão com viés a finalizar. As costas fecham com botões ou molas e eu escolhi as molas. Neste caso azuis porque queria incluir alguma cor no branco e preto para dar algum destaque. Obviamente escolhi a cor preferida dela. 

The top is lined except for the sleeves and peplum skirt, and for my lining I used leftovers from a very light cotton sheet. It features puff sleeves and bias tape to finish it. The back closes with either buttons or snaps, and I went with the snaps. In this case I used blue ones because I wanted some sort of contrast with the black and white from the fabric. Obviously I chose her fave color. 


O molde apresenta-se nos tamanhos 3M-12A e não tem muitas opções. O que aqui está, é o que é. Um molde prático, rápido e fácil de costurar perfeita para quem está a começar. Para a minha filha fiz tamanho 7. A tabela das medidas metia-a num 5 no peito, mas arrisquei cortar o 7. Quando o fiz, e enquanto costurava só pensava que lhe ia ficar enorme, quase me servia a mim, mas fiquei surpreendida quando ela o vestiu. Sim, ainda está um pouco largo, mas nem perto do que eu pensava que ia ficar.

The pattern comes in sizes 3M-12Y and doen't have much options. What you see is what you get. It's practical, quick and easy to sew, perfect for begginers. For my daughter I made size 7. The size chart would put her at a 5 (chest) but I risked a 7. When I made it, and while I was sewing I kept thinking this would be huge on her, it would nearly fit me, but I was surprised when she tried it on. Yes, it still is a bit too wide for her, but not as close as I thought it would. 

2018-04-05

PR&P15 |Signature Style|

Scroll down for english, please!


Esta já é a última semana desta temporada do Project Run & Play, o que significa a semana de Signature Style (um look que nos defina, vá!). Para mim significa apenas costurar seja o que for que queira costurar, e desta vez escolhi fazer algo que andava na minha mente há muito tempo, mais precisamente desde que testei o molde fenix romper o ano passado. Adorei o meu e sabia que ia adorar ver a minha filha em algo do género, por isso decidi tentar. 

It's the last week of this season in Project Run & Play and that always means Signature Style week. For me it just means sewing whatever I've been wanting to, and this time I choose to make something that has been on my mind for about a year after I tested the fenix romper. I loved my adult version and I knew I'd love to see my daughter in something similar, so I gave it a try. 


Tentei desenhar o meu próprio molde para a minha menina de 6 aninhos mas falhei... a frente ficou demasiado baixa, sei que não o poderá vestir sem uma camisola por baixo - a parte boa é que até gosto de como fica. Ainda não desisti, digamos que este será apenas uma prova até conseguir aperfeiçoar o molde, entretanto acho que este até dá para vestir. 

I tried to draft a similar pattern for my 6 year old, but I failed... the front is too low and I know she won't be able to wear it without a shirt underneath - good thing is I like how the layered option looks like. I haven't given up yet, this was like my first muslin and I have to get it perfected, meanwhile I think this is kinda wearable. 


O tecido que usei, é também o que usei no primeiro que fiz para mim aquando do teste, nunca falei realmente sobre ele aqui no blog, cheguei sim a publicar uma foto com ele vestido durante o desafio do Me Made May e que podem ver aqui. O modelo pede tecidos com um bom cair e a boa verdade já não me restam muitos com tamanho suficiente - e que sejam apropriados à idade dela, claro. Que bem que me ando a portar, a usar mais do que a comprar... se bem que cheira-me que este mês ainda me vou portar mal. 

I actually used the same fabric I used for my wearable muslin, which I never really blogged about, but have posted a photo here duirng last year's Me Made May. This patterns calls for fabric with a great drape and I sure ain't got that many of those that are long enough to cut it - and that is child appropriate, of course. Oh I'm doing so well, using more from my stash than I bought in new... though it smells like I might be a bad girl ahead this month. 

2018-03-31

PR&P15 |From outta space|

Scroll down for english, please!


Ora bem! Não estava nada inspirada para esta semana. Tinha uma ideia inicialmente mas faltou-me a motivação para a levar adiante. Estava mesmo prestes a desistir de acompanhar o desafio desta semana, mas acabei por encontrar este tecido às riscas cinzentas e prateadas enquanto remexia nos meus tecidos, e achei-o apropriado para o tema, o prateado faz-me lembrar cenas do espaço e tal... 

Alright! I wasn't really inspired by this week's theme. I had an idea at first but no motivation to do it. I was actually ready to give up at all sewing along this week, but somehow, as I was going through my fabric stash, I came across this silver and grey striped fabric which I thought was appropriate, and silver reminds me of spacy stuff anyway... 


O tecido foi-me oferecido mais uma vez, desta vez pela minha amiga Patrícia, podem encontrá-los na loja Maçãs d'Amor.Este retalho foi o que me sobrou de uma camisola que fiz para mim no ano passado - agora por isso, nunca cheguei a publicá-la por aqui. Há uma foto no meu IG. Enfim... come já não era muito, não tive outra opção senão fazer dele o melhor possível e usar a imaginação. Usei o molde Hazel Blouse da Petite Stitchery & Co. Usei-o aqui também. 

The fabric was a gift again, this time from my friend Patrícia, you can get it over Maçãs d'Amor. This scrap I had was actually the leftovers from another shirt I made myself last year - which reminds me I haven't post about it yet. There's a photo on IG though. Anyway... because I didn't have a lot anymore I had no choice but work it the best I could and get creative. I used the Hazel Blouse pattern by Petite Stitchery & Co. I have used this pattern before, in here


Usei a opção da manga curta porque não tinha tecido suficiente para fazer as mangas em balão maravilhosas novamente. Para cortar a parte da saia da túnica aproveitei ao máximo o que sobrou depois de ter cortado todas as outras peças da parte de cima, assim que não segui as medidas das instruções. Também mudei o comprimento da banda das mangas, em vez de 5cm, eu cortei 12,5 cm. Costurei tudo esta manhã enquanto fazia o almoço e corria atrás do meu mais novo. Fiz um tamanho 6. 

I did the short sleeve option because I didn't have enough fabric to make those beautiful bubble sleeves again. Also, used as much as I could from what I got left after cutting all the top pieces to cut the skirt. I didn't follow instructions on cutting for this. I also changed the lenght of the sleeve band, in this case, I made it larger, instead of cutting 2" I cut it 5". I sewed it up this morning between making lunch and running after my youngest. I made a size 6. 


Depois de terminar o top olhei em volta, para algumas peças que tinha penduradas no meu espaço. Lá estava este Phresh Blazer de xadrez verde (molde da Winter Wears Designs, que já usei muitas vezes antes, aqui podem ver mais quatro. E esta semana acabei mais um!). Estava quase terminado havia semanas, só tinha alguns detalhes por fazer como terminar as mangas, fazer a casa para o botão, coser o mesmo e acabar de colocar a fita de viés na bainha. Por ser verde relacionei-o aos homenzinhos verdes (extraterrestres). 

After finishing the top I stared at the other pieces I had hanging in my craftroom. There was this green plaid Phresh Blazer (pattern by Winter Wears Designs, which I have used many times before - here's four more for you to see. I also finished another this past week!). It was nearly finished for weeks, I only had to do the sleeves, buttonhole and button and finish the bias binding on the hem. Because it was green, I related it to the little green fellas (alliens). 


O blazer tem várias opções e desta vez as que escolhi foram os folhos atrás que reciclei deste projecto, os bolsos embutidos com abas, e as mangas compridas e franzidas. Na verdade cortei o comprimento 3/4 porque não tinha tecido suficiente para cortar as compridas, mas depois cortei mais umas peças ao contrário do fio do tecido para criar um padrão contrastante e alongar as mangas. Oh, o tecido? Comprei-o no Pagapouco local há muitos anos. Já estava na hora de o tirar do armário. O tamanho escolhido foi o 8, porque o meu tecido não tem elasticidade como o molde pede, ainda lhe fica um pouco larguinho, mas já se sabe, assim dura mais tempo. 

The blazer has several options and this time I did the ruffles on the back, I actually recycled them from this project here, the inseam pockets with a welt and the long gathered sleeves. I actually cut the 3/4 sleeves option because, you know, I am trying to destash by fabrics and using what I have. I didn't have enough to cut the long sleeves, so I then cut another piece cut on the bias for contrasting print to add to the sleeve lenght. Oh, that fabric? Bought in a local shop many years ago. It was about time to get it out. I made a size 8 because my fabric didn't have any stretch as the pattern called for, it is still a bit too big for her but that's fine, it'll last longer. 


E para terminar, os calções - não sei como os relacionar com o tema, mas completam o meu look. ahahah Lembram-se de ter dito logo na primeira semana que os tinha cortados e meio começados em cima da mesa?! Pois bem, aqui estão. Acabei-os logo nos dias seguintes à publicação, e logo na primeira vez que a miúda os usou o fecho partiu. Era velho, tinha-o reciclado de alguma outra peça que desfiz anteriormente e não confirmei como costumo fazer se ainda estava bom. Fiquei tão fula comigo mesma, é que eu e fechos não somos os melhores amigos, e apesar de conseguir trocá-los e deixar tudo bonitinho na mesma,  o-d-e-i-o  ter de o fazer. Por acaso, arranjei-o ontem, mesmo a tempo para as fotos de hoje. 

And to finish, there's the shorts - I don't know how to relate them to the theme, but they would finish up my look. ahahah Remember how I said back in week one that I had the shorts cut and half started on my sewing table?! Well, here they are. I finished them just a few days after my post, and the very first time my daughter wore them the zipper broke. It was old, I reused it from some piece I refashioned in the past and although I usually test it before actually sewing it to a new garment, I haven't this time. I was so mad about it, just because zippers and I aren't friends, and although I can beautifully change a zipper, I  h-a-t-e  to do so. I fixed it yesterday, just in time to have it ready for today's photos.


O tecido é uma bombazine não muito grossa nem fina que comprei numa loja local há algum tempo, directamente do cesto dos retalhos, por isso mais uma vez não era muito. Era o suficiente para este projecto. Usei o molde 601 Calções de Menina da Burda Kids 1/2010 (da Espanha). Os calções têm um fecho com guarnição à frente, uma mola em vez de um botão porque a miúda ainda se debate com os mesmos, bolsos de encaixe na anca, cintura com elástico ajustável, pregas na frente, dobras na bainhas, pinças atrás e bolsos debruados com paletas. 

This is a medium light corduroy I bought locally, a long while ago, and I got it from the scraps bin, so not much once again. It was enough for this project though. I used the pattern 601 Girl's Shorts from Burda Kids 1/2010 (from Spain). The shorts feature a functional zipper fly, a snap instead of a button because my girl still struggles with them, side pockets, adjustable elastic waist, front pleats, folded hem, back darts and welt pockets with flaps. 


O tecido do forro que usei nos bolsos e na cintura, era apenas um pequeno retalho que recebi juntos com aquele lote imenso que uma leitora aqui do blog me enviou e do qual falo frequentemente. Ainda tenho muita coisa do mesmo por usar, apesar de ir usando em quase todas as peças que tenho vindo a fazer desde então. Era pedacinho era tão pequeno que tive que andar a remendar para conseguir a peça da cintura. 

The lining fabric I used in the pockets and waistband, was just a small scrap I got in that bundle a reader sent me a while ago, it came with so many pieces of fabric, I still have a lot although I've been using them in almost every project I made ever since I got them. This scrap was so small I had to patch it to get enough lenght for the waistband piece. 

Labels

About us Acessories Adult Adults Advent Calendar Appliqué Baby Baby Acessories Baby Doll Acessories Baby Doll Sling Baby Shoes Back Warmer Pillow Backpack Bags Barbie Beading Beads Bedsheets Beret Bibs Bikini Blankets Blazer Bleached Blog Tour Blogs Blouse Bolero Book Covers Book Review Boots Bowling Game Boxers Boy Bracelet Bralette Breastfeeding Pillows Briefs Button Shirt Button Up Shirt Cap Cardigan Carnival Causes Cell Phone Stand Challenge Create Charger Support Chevron Christmas Clutch Coats Commitments Constant Change Contests cookies Corset Cose+ Costumes Cowl CraftingCon Crochet Crossstitching Cushions Dance Outfit dashiki Dia de Los Muertos Diaper Pouch Doll Clothes Dolls Drawstring Bags Dreamcatcher Dress Duvet Cover e-book E-Zine Review Easter Embroidery EnglishPaperPiecing Fabric Baskets Fabric Chess Game Fabric dolls Fabric Flowers Fabric Games Fabric Memory Games Fabric Printing Fabric Stash Fabric Three in a Row Game Fabric Toys Features Felt Flamenco Dress Flamenco pants Food Free PDF Pattern Fun Cakes Funny Fur Gifts Girl Giveaway Glasses Case Granny Squares Guest Posting Hair Clips Hair Clips Hanger Halloween Hand Warmer Pillows handbag Handmade Cards Harem Headband Henley Highlow Home Homemade Liquid Soap Hoodie How to Inspiration Jackets Japanese Sewing jeans Joggers Jumper KCW Keyring Kid's Choice Series Kid's Crafts Kimono Kleenex Purse Pouch knitting Knock it Off Leather lederhosen Leg Warmers Leggings lunchbag Maratón Telaria MashUp Series Maternity MeMadeMay; Men Mending Challenge Mini-Sofa Cover Mobile Mobile bag Mom's Monthly Wrap Up Needle Rolls Nightgown No Sew Nursery One Thimble Onesies Operation: Project 0$ Other Crafts Ottobre Overalls Pajamas Pants Paper Crafts Party Favours Party Time Patchwork Pattern Pattern Testing Pattern Tour Pear Puff Seat Pencil Case Pencil Rolls Peplum Peques de Cine Peter Pan Collar Pijamas Pillow Covers Pillows Piñata Cake Pinterest Challenge Pipe Cleaner Crafts Placket Pockets Plastic bags Dispenser Pleats Pocket Slings Podcast Pompoms Pouch Practising ´n Improving Project Run and Play Project Sewn Projects Pt Refashion Week Quilting Recipes Recycled Ribbon Organizer Recycling Refashion Month 2012 Refashion Month 2013 Refashion Month 2014 Refashion Month 2014 (2) Refashion Month 2015 Refashion Month 2016 Refashion Runway Refashioning Retro Reverse applique Reviews Ribbon Roses Robe Romper Romper Dress Romper Week Roots Round up Rucksack Saving Series Saving while Sewing Savings Made By Sewing Scarf ScrapsBusting Sequins Sew 20's Sew Along Sew Geeky Sew In Tune Sew-a-bration of Womanhood Sew-vivor Sewing Tips Shirt Shorts Skirt Skort Sleep Sack Slings Slippers Snowflakes & Lace Sock Monkey Socks Stitching Suit Surprise Sweater sweatshirt Swimsuit swimwear T-shirt The Hearties The Sew Off Thrift shopping Tights Tips Tissue Case Toddler Top Top 12 of 2012 Top 5 of 2013 Top 5 of 2014 TOP 5 of 2015 top 5 of 2017 Top Stitchers Trousers TSNEM Tunic Tutorial Tutu underpants Underwear Upcycling Vest Videos Vintage waistbag Wallet When things go wrong WIP Women Wreath Year Wrap Up

Cose +

Cose +
Magazine de Costura em Poruguês